A battery-friendly WiFi reconnaissance and geolocation system for ESP32.
Main features of the ESP32 Locator:
- GPS-less Geolocation: The system determines its position with 10–20 meter accuracy using only WiFi scans and the Google Geolocation API, eliminating the need for a dedicated GPS module.
- On-Device Analysis and Movement Detection: The software can detect movement without an internet connection by calculating the "DIFFS" (symmetric difference) of MAC addresses between consecutive scans.
- Battery-Friendly Operation: The device is designed for low power consumption, primarily cycling between a deep sleep state and quick WiFi scanning intervals.
- Opportunistic "Hitchhiking" Connectivity: Through its "Open WiFi Mode," the device can automatically detect, connect to, and bypass captive portals of open networks to sync time via SNTP or upload data.
- Flexible Data Management and MQTT Integration: It supports storing up to 500 scans in non-volatile storage (NVS), exporting data as JSON, and publishing real-time location data to remote MQTT brokers.
- Offline Analysis Tool: Includes HTML/JS-application for lokal off-device analysis of collected data.
The tool uses only WiFi, no GPS required. In densly populated areas with any kind of WiFi cells this works with an accuracy of 10-20 meters. It uses WiFi scans and the Google GeoLocation API. Moderate use of this API should be free, but you will need your own API key (see below).
The device cycles between deep sleep and WiFi scanning, storing nearby access point data in non-volatile storage. When woken by the boot button (or on first power-up), it serves a web UI for browsing scan results, geolocating scans via Google's API, and viewing positions on an embedded map.
If you don't have an API key or if you don't want to deploy it on an embedded device, you can simply use the ESP32 Locator as scanner and export the scans for later use.
The device operates in two modes, selected automatically by the wakeup cause:
- ESP32 wakes from deep sleep
- Performs an active WiFi scan (no connection needed)
- Stores discovered access points (BSSID, RSSI, channel, auth mode, SSID) to NVS
- If open WiFi mode is enabled, attempts to connect for SNTP/MQTT:
- Home WiFi first: if the configured home WiFi (SSID + password from the Config page) appears in the scan results, connects to it with password authentication -- preferred over open networks
- Open WiFi fallback: if home WiFi is unavailable or not configured, tries open networks from the scan results as before
- Sync only: SNTP time sync
- MQTT + Sync: publish scan data to configured MQTT broker, then SNTP sync
- Returns to deep sleep for the configured interval (default 60s)
Scans with zero APs are discarded. When NVS storage reaches capacity, the oldest scan is evicted. Open networks that require passwords or fail captive portal handling are automatically blocklisted.
- Attempts to connect to a stored WiFi network (STA mode)
- If no credentials are stored or connection fails after 5 retries, starts a SoftAP captive portal ("ESP32_Locator", open, 192.168.4.1)
- Syncs time via SNTP in STA mode (pool.ntp.org)
- Starts the web server on port 80
- Onboard LED lights up to indicate the web server is ready
From the web UI you can:
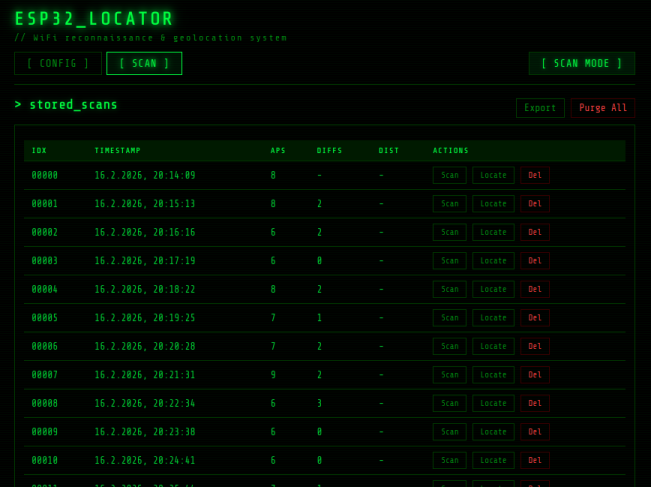
- Browse scans -- table with index, timestamp, AP count, DIFFS column (highlighted red when more than half the APs differ), cached location indicator, and distance to previous located scan
- View scan details -- full AP list with SSID, BSSID, signal strength bar, channel, and auth mode
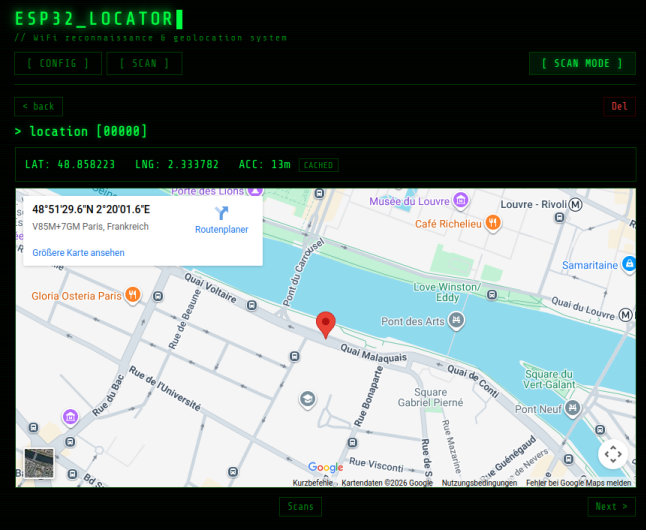
- Geolocate -- sends scan data to the Google Geolocation API, displays coordinates and accuracy, renders position on an embedded Google Map. Results are cached in NVS so repeat views are instant without another API call
- Export -- downloads all scan data (including cached locations) as a JSON file named
LocatorScan_<date>_<time>.json - Configure WiFi -- scan for nearby networks, select and enter credentials; the device reboots into STA mode. "Forget" clears stored credentials and reboots into AP mode
- Configure Open WiFi -- set the open WiFi mode (off / sync only / MQTT + sync), manage the SSID blocklist
- Configure MQTT -- set broker URLs for last scan and all scans (format:
mqtt://broker:port/topic/path), wait cycles for "publish all", client ID, username, and password - Configure settings -- set the Google API key, web password (HTTP Basic Auth), scan interval (10--3600 seconds), and default boot mode
- Start Scanning -- triggers deep sleep to begin scan cycles; resets the MQTT publish cycle counter; press the BOOT button to return to web server mode
On power-on or reset, the device enters web server mode by default. This can be changed in the Config page under DEFAULT_BOOT_MODE:
- Web Server (default) -- power-on starts the web server, in the local network you can reach the Locator via http://locator.local using mDNS in most environments
- Scan Mode -- power-on enters scan mode immediately, useful for battery-powered deployments where the device should start scanning without manual intervention
On ESP32 pressing the BOOT button during deep sleep always enters web server mode, regardless of this setting. Timer wakeup always enters scan mode.
On ESP32-Cx the BOOT cannot directly wake up the CPU. Instead you have to reset the ESP. If in Web Server mode you are done. If in Scan mode, you have to press BOOT within 3 sec after reset to enter the Web Server mode again.
- The device starts a SoftAP named ESP32_Locator (open, no password)
- Connect your phone or laptop to this network
- Wait for captive portal or open http://192.168.4.1 in a browser
- Go to the Config page
- Click Scan to list nearby WiFi networks
- Select your network, enter the password, and click Connect
- The device reboots and connects in STA mode with a DHCP address
Open the Config page, enter new credentials or use Scan to find networks, and click Connect. The device reboots to the new network.
Click Forget on the Config page to clear stored credentials. The device reboots into AP mode so you can reconfigure.
If the stored network is unavailable (wrong password, out of range), the device falls back to AP mode after 5 retries (~30 seconds), so you can always reconfigure via the captive portal.
The scan data collected by the ESP32 enables several types of analysis directly from the web UI, without any external tools:
The DIFFS column in the scan overview shows the symmetric difference between consecutive scans -- how many MAC addresses appeared or disappeared. A low diff (0--3) means the device is stationary. A high diff (highlighted red when >50% of APs change) indicates the device has moved to a different location. This works without any API calls or internet connection.
By geolocating individual scans via the Google Geolocation API, you can determine where the device was at each scan timestamp. Located scans are marked with a bold "Locate" button in the overview. The location is cached in NVS after the first API call, so viewing the same location again is instant.
Once multiple scans are geolocated, the overview automatically computes the Haversine distance between consecutively located scans. The "dist" column shows the straight-line distance in meters or kilometers, forming a path of the device's movement over time.
Each scan captures a snapshot of the RF environment: which networks are visible, their signal strengths, channels, and security modes. By comparing scans you can:
- Identify recurring locations (same set of BSSIDs at similar RSSI levels)
- Detect new or disappeared access points in an area
- Observe signal strength variations indicating movement within a building
The Export function downloads all scan data as JSON, including full AP details and any cached location coordinates. This data can be imported into external tools for further analysis, mapping, or archival.
- ESP32 development board (e.g. ESP32-DevKitC)
- 4MB flash (standard on most devkits)
- USB cable for power and programming
- No additional wiring needed -- the BOOT button (GPIO0) and onboard LED (GPIO2) are standard on most devkits
Requires ESP-IDF v5.5 or later.
# Build
idf.py build

# Flash and monitor
idf.py -p /dev/ttyUSB0 flash monitor
Press Ctrl+] to exit the serial monitor.
No compile-time WiFi configuration is needed -- credentials are set at runtime through the web UI.
| Option | Default | Range | Description |
|---|---|---|---|
LOCATOR_SCAN_INTERVAL_SEC |
30 | 10--3600 | Deep sleep interval between scans |
LOCATOR_MAX_STORED_SCANS |
500 | 10--1000 | Max scans in NVS (oldest evicted) |
LOCATOR_MAX_APS_PER_SCAN |
10 | 5--30 | Max APs recorded per scan |
LOCATOR_BOOT_BUTTON_GPIO |
0 | -- | GPIO for boot button (9 for C3/C6) |
LOCATOR_LED_GPIO |
2 | -- | GPIO for onboard LED |
| LOCATOR_OPEN_WIFI_ENABLED | y | -- | Enable opportunistic open WiFi connection |
The default boot mode, scan interval, Google API key, web password, WiFi credentials, open WiFi mode, MQTT configuration, and blocklist can all be changed at runtime through the Config page. All settings are stored in NVS and persist across reboots and deep sleep cycles.
Two Google APIs are used:
- Geolocation API -- the ESP32 sends scanned AP data via HTTPS and receives lat/lng coordinates. Enable it in the Google Cloud Console.
- Maps Embed API -- the browser renders the location on a Google Map iframe. Enable it in the Google Cloud Console.
Both use the same API key, entered in the web UI's Config page.
Uses a custom partition table with 512KB NVS on 4MB flash. Data stored in NVS:
- Scan data -- compact binary blobs in a ring buffer (11-byte header + N x 42-byte AP records). A scan with 10 APs is ~431 bytes.
- Location cache -- 24-byte blob per geolocated scan (lat, lng, accuracy as doubles). Cached on first API call, served directly on subsequent requests.
- WiFi credentials -- SSID and password strings.
- Settings -- API key, scan interval, web password, default boot mode.
- Open WiFi config -- mode, MQTT URLs, MQTT credentials, cycle counter.
- Blocklist -- FIFO ring buffer of 10 open WiFi SSIDs to skip.
With 512KB NVS, approximately 500 scans with locations fit comfortably.
| Method | Endpoint | Description |
|---|---|---|
| GET | / |
Serve web UI |
| GET | /favicon.ico |
Serve favicon |
| GET | /api/scans |
List all scans (id, timestamp, AP count, diffs, location if cached) |
| GET | /api/scan?id=N |
Full scan detail with all AP data and location |
| POST | /api/locate?id=N |
Geolocate scan (cached after first call) |
| DELETE | /api/scan?id=N |
Delete one scan |
| DELETE | /api/scans |
Delete all scans |
| GET | /api/settings |
Get all settings (API key, MQTT, scan interval, etc.) |
| POST | /api/settings |
Save settings (JSON body) |
| POST | /api/sleep |
Enter deep sleep (start scanning), resets MQTT cycle counter |
| GET | /api/wifi/status |
Current WiFi mode, IP, SSID |
| GET | /api/wifi/scan |
Scan for nearby WiFi networks |
| POST | /api/wifi/connect |
Save WiFi credentials and reboot |
| POST | /api/wifi/forget |
Clear WiFi credentials and reboot to AP mode |
| GET | /api/blocklist |
List blocklisted open WiFi SSIDs |
| DELETE | /api/blocklist |
Clear entire blocklist |
| DELETE | /api/blocklist?ssid=X |
Delete single blocklist entry |
main/
  main.c              App entry point, mode selection, deep sleep, MQTT hook
  wifi_scan.c/h       WiFi scanning (STA mode, no connection)
  wifi_connect.c/h    WiFi connection management (STA + SoftAP fallback)
  scan_store.c/h      NVS storage: scans, locations, settings, MQTT config, blocklist
  web_server.c/h      HTTP server and all URI handlers (CORS enabled)
  geolocation.c/h     Google Geolocation API client (HTTPS + cJSON)
  open_wifi.c/h       Opportunistic open WiFi connection + captive portal handling
  mqtt_publish.c/h    MQTT client: publish scans as retained JSON to broker
  Kconfig.projbuild   Menuconfig options
  CMakeLists.txt      Build config, embedded files
  pages/
    index.html        Single-page web UI (Matrix-themed)
    favicon.png       Browser tab icon
locator.html          Standalone local analyzer (see below)
mqtt_sub.sh           Shell script: subscribe to MQTT topic, save JSON for locator.html
partitions.csv        Custom partition table (512KB NVS, 4MB flash)
sdkconfig.defaults    Flash size, partition table, TLS cert bundle, WiFi scan sorting
When open WiFi mode is enabled (sync only or MQTT + sync) and the device has stored WiFi credentials (configured via the Config page), the device will prefer connecting to the home WiFi network during scan mode. If the configured SSID appears in the scan results, the device connects using the stored password for SNTP sync and optional MQTT publishing -- the same actions it would perform on an open network, but with authenticated access and no captive portal handling. If the home network is not found in the scan results, the device falls through to open WiFi as usual.
When enabled (Config > OPEN_WIFI_MODE), the device opportunistically connects to open WiFi networks detected during scans. Three modes are available:
- Off -- no open WiFi connections
- Sync only -- connect to an open network, sync time via SNTP, disconnect
- MQTT + Sync -- connect, publish scan data via MQTT, sync time, disconnect
The device automatically handles captive portals by parsing and submitting HTML forms. Networks that require passwords, fail portal handling, or don't provide internet access are added to a blocklist (FIFO, 10 slots) and skipped in future cycles. The blocklist can be managed from the Config page.
When open WiFi mode is set to "MQTT + Sync", the device publishes scan data to an MQTT broker after connecting to an open network.
- MQTT_URL_LAST_SCAN -- broker URL with topic for the latest scan (e.g.,
mqtt://broker:1883/locator/last) - MQTT_URL_ALL_SCANS -- broker URL with topic for all scans (e.g.,
mqtt://broker:1883/locator/all) - WAIT_CYCLES_FOR_ALL -- number of scan cycles between "publish all" operations (0 = every cycle)
- MQTT_CLIENT_ID -- client identifier sent to the broker
- MQTT_USERNAME / MQTT_PASSWORD -- broker authentication credentials
The URL format is mqtt://host:port/topic/path (or mqtts:// for TLS). The path portion after the third / is used as the MQTT topic.
- Last scan: published every cycle as a retained QoS 0 message (single JSON object)
- All scans: published every N cycles as a retained QoS 0 message (JSON array)
- The cycle counter resets each time scan mode is started from the web UI
- If both URLs point to the same broker, a single connection is reused
- JSON format matches the
/api/scanendpoint (id, timestamp, aps with ssid/bssid/rssi/channel/auth, location if cached)
A helper script subscribes to the MQTT topic and saves the message as a JSON file compatible with locator.html:
./mqtt_sub.sh mqtt://broker:1883/locator/last username password ./scansThe script reads the retained message and saves ist to LocatorScan_<timestamp>.json. Open the file in locator.html via "Import JSON". The script requires the Mosquitto client Tools ("mosquitto_sub") to be installed.
A standalone HTML/JS application that runs entirely in a local browser, independent of the ESP32's embedded web UI. Open locator.html directly in a browser (double-click or file:// URL).
- Connect to ESP -- enter the ESP32's IP address to fetch all scans over the local network (requires the ESP to be in web server mode). CORS headers on the ESP allow cross-origin access.
- Import JSON -- load a previously exported scan file or a file saved by
mqtt_sub.sh. Location data included in the export is restored automatically, and already-located scans are marked in the overview.
- Same terminal-style interface as the on-device UI
- Google API key stored locally in the browser's
localStorage-- never sent to the ESP - Client-side geolocation -- calls the Google Geolocation API directly from the browser, no proxy needed
- Locate All -- batch-geolocate all unlocated scans with a progress bar
- Export -- downloads all scan data including location results as JSON (re-importable)
- Scan overview with AP count, diffs, distances between consecutive located scans